CMS - SmartModules
Creating your own SmartModule
## Introduction
---
**ABC SmartModules** are a CMS module type that allows you to extend the CMS interface with your own views. In contrast to
the default 'content modules', this type of module invokes a Controller Action, that lets you use the full application
stack and render your own template. In addition to that, you are able to load custom JavaScript and CSS for your
SmartModule.
In this demonstration we will demonstrate a SmartModule that can change the appearance of the blog demo.
Please read our [SmartModules](https://docs.angrybytes.com/p/abc-manager/6.0/docs/cms/smart_modules/index.html)
documentation chapter first.
This demonstration assumes you have already read the documentation about creating an ABC SmartModule and will not explain the details in depth.
Note - all demonstrations occur in realtime! Open this project in your IDE to view and/or
modify the actual sourcecode used in the demonstrations.
### The Blog Configurator Dashboard SmartModule
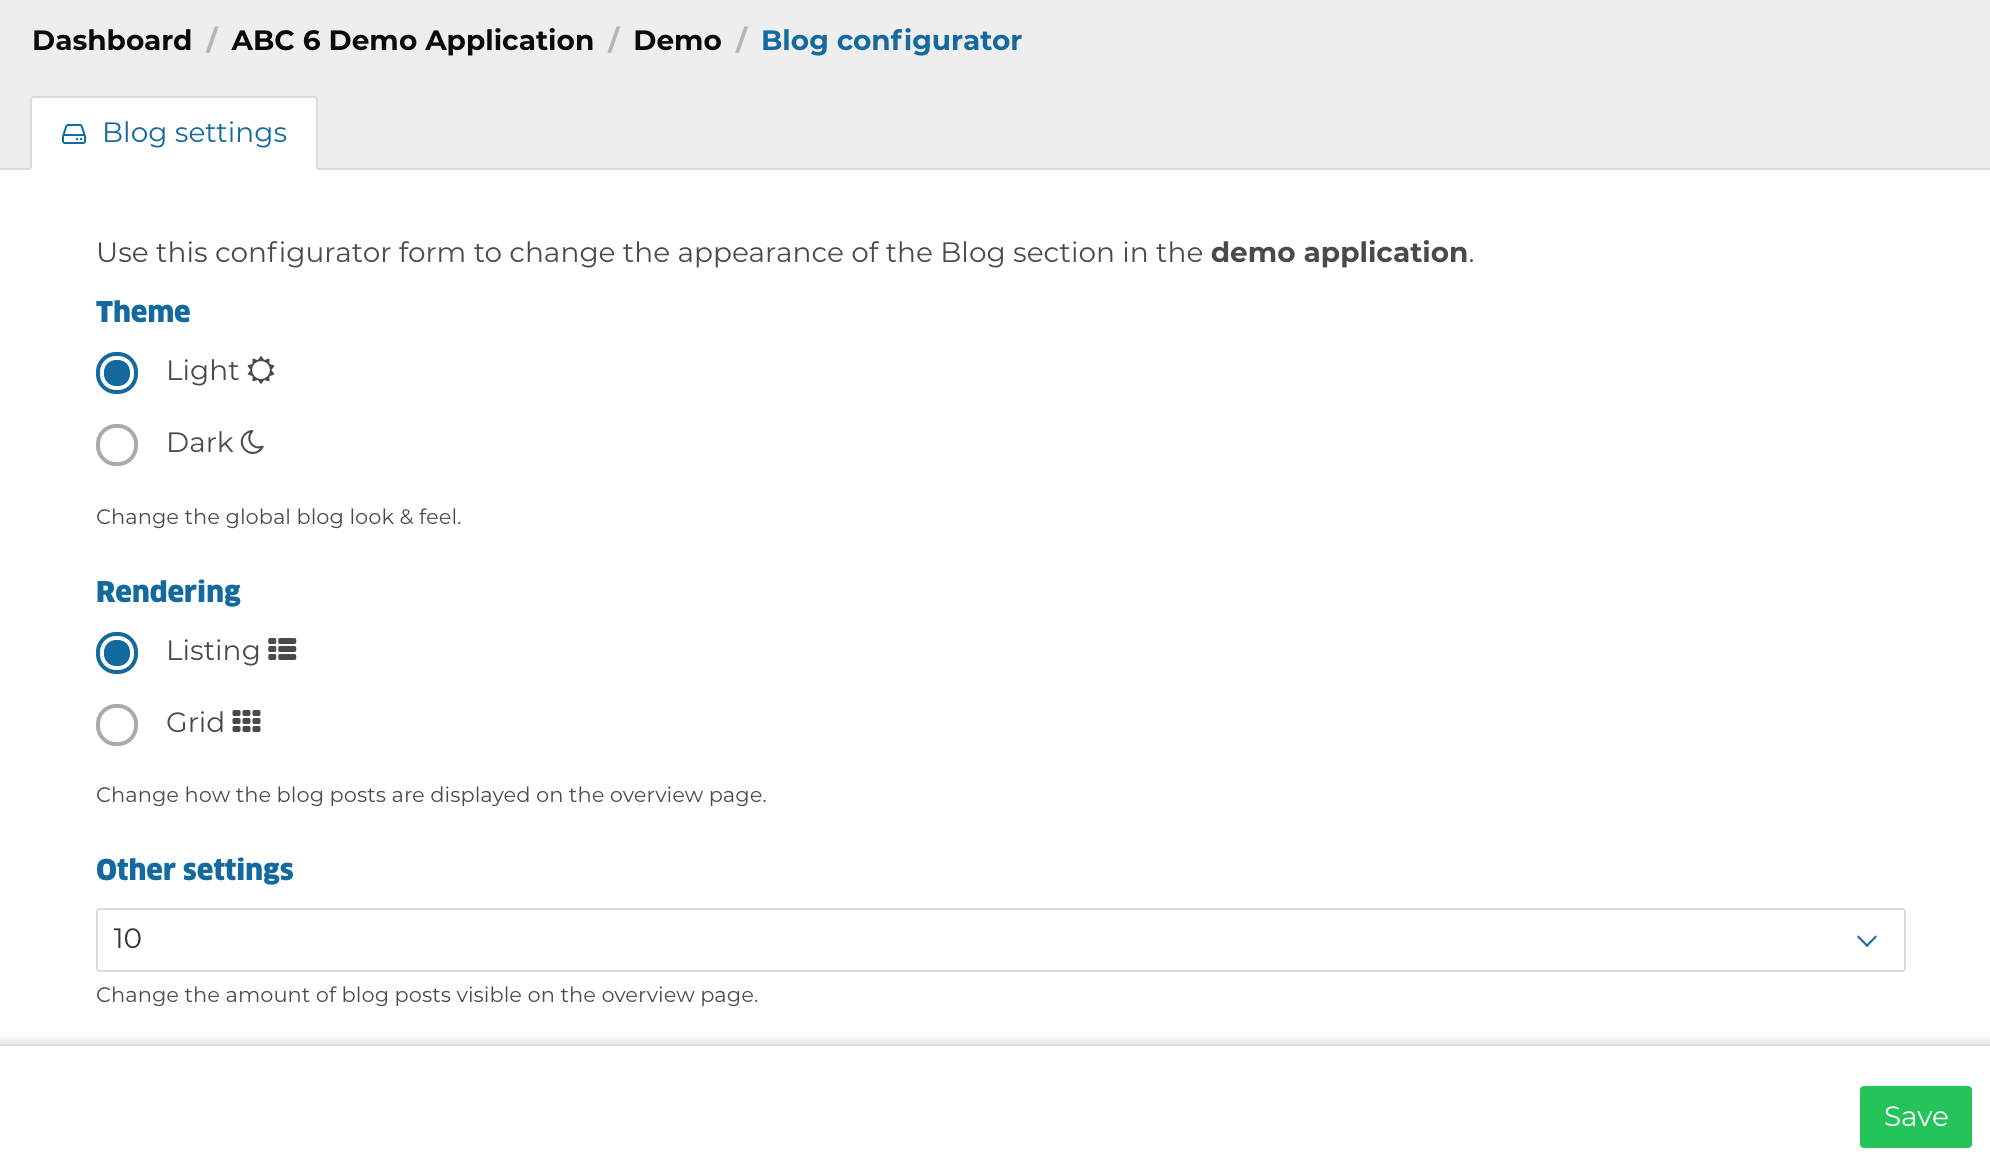
This module demonstrates how to use a SmartModule to configure the look & feel of an application; the blog page in the demo app.
It allows users to change the theme and rendering options for the blog section.
The end result:

We will now describe how the SmartModule has been created.
#### The SmartModule Controller
The controller style class will render the SmartModule view, include addition CSS an JavaScript assets for the view
and maps module "types" (as used in the `menu.yml`) to controller actions (methods).
The basic class structure looks as follows:
```php
namespace Demo\ContentBundle\BackendInterface\SmartModule;
use Abc\RestBundle\Http\Helpers\Response\ErrorBuildersTrait;
use Abc\RestBundle\Http\Helpers\Response\JsonTrait;
use Abc\RestBundle\Http\Helpers\Response\FractalTrait;
use Demo\ContentBundle\Traits\Settings as SettingsTrait;
use Symfony\Component\HttpFoundation\Request;
use Symfony\Component\HttpFoundation\Response;
use League\Fractal\Resource\Item;
use League\Fractal\Serializer\JsonApiSerializer;
/**
* Configurator Module For Demo Blogs
*/
final class BlogConfigurator extends \Abc\BackendBundle\SmartModule
{
// Traits
use ErrorBuildersTrait, FractalTrait, JsonTrait, SettingsTrait;
/**
* {@inheritdoc}
*/
public function getSupportedTypes(): array
{
return ['demo-blog-configurator'];
}
/**
* {@inheritdoc}
*/
public function getTypeToActionMapping(): array
{
return [
'demo-blog-configurator' => 'configureBlog'
];
}
public function getView(): string
{
return 'blog_configurator';
}
public function configureBlogAction(Request $request): Response
{
$id = 'blog_settings';
$itemsPerPage = [2, 5, 10, 25];
$success = true;
// Persist the settings if the request is a POST.
if ($request->getMethod() === Request::METHOD_POST) {
$settings = [
'items' => $request->request->get('items'),
'theme' => $request->request->get('theme'),
'view' => $request->request->get('view')
];
$success = $this->persistSettings((object) $settings);
}
// Fetch settings from the database.
$settings = $this->getSettings();
$data = compact('id', 'itemsPerPage', 'settings', 'success');
// Create a resource for the Fractal manager.
$resource = new Item($data, function ($data) {
return $data;
}, 'settings');
// Return the response in JSON.
return $this->json(
$this->getFractalManager()->createData($resource)->toArray()
);
}
protected function getFractalSerializer(): JsonApiSerializer
{
return new JsonApiSerializer;
}
}
```
You can see in the `getTypeToActionMapping()` that the value in the array is the action method. This method can be
called as a get request or as a post, depending on what method you chose in your api call.
Now, lets register the module in the service container, so ABC Manager can load the **tagged service**:
```yaml
# File: ./src/Demo/ContentBundle/Resources/config/services/cms-modules.yml
# Blog Configurator smartmodule
demo.cms.smart_module.blog_configurator:
class: Demo\ContentBundle\BackendInterface\SmartModule\BlogConfigurator
parent: demo.backend.smart_module
# Tag it as a smart module
tags:
- name: demo.backend.smart_module
```
ABC Manager is now able to find and load the SmartModule.
The SmartModule requires to be included in the CMS menu configuration file `menu.yml` for the demo application
so it becomes accessible in the CMS:
```yaml
# File: ./applications/demo/application/Resources/config/menu.yml
# CMS Menu configuration for the "demo" application
menu:
# Label for the application used in the CMS interface.
label: 'Demo App'
# Module groups collection
modulegroups:
demo:
label: 'Demo'
modules:
blog_config:
label: 'Blog configurator'
# Set type to smart module
type: smart_module
# Configure the Smart Module by its tag
smart_module: demo-blog-configurator
```
At this point, we have successfully created the SmartModule and are ready to fill in the details.
#### The SmartModule Logic
The SmartModule loads JS/CSS assets to be included in the CMS:
```php
// File "src/Demo/ContentBundle/Bundle.php"
/**
* {@inheritdoc}
*/
public function getCmsJavaScript(): array
{
return [
'/bundles/democontentbundle/dist/bundle.js'
];
}
```
In this example we create the smart module in Vue JS. For more
information how to setup the frontend server with Webpack see the
documentation.
First we take a look at our `main.js`. As can be seen in the code, we import `Abc` (window.Abc). The `Abc` variable
exports libraries & functions which you can reuse in your smart module, but also contains all registered fields, smart
modules & widgets. As you can see we merge our smart modules (`smartModules/index.js`) with the `Abc.smartModules`
```javascript
// File: src/Demo/ContentBundle/Resources/front/src/main.js
import Abc from 'abc-manager'
import fields from './fields'
import overviewFields from './overviewFields'
import widgets from './widgets'
import smartModules from './smartModules'
// Add our fields to the ABC collections.
Object.assign(Abc.fields, fields)
Object.assign(Abc.overviewFields, overviewFields)
Object.assign(Abc.widgets, widgets)
Object.assign(Abc.smartModules, smartModules)
```
We then import the BlogConfigurator in the index.js. The key in the collection must match the getView property in the
smart module.
```javascript
// File: src/Demo/ContentBundle/Resources/front/src/smartModules/index.js
import BlogConfigurator from './BlogConfigurator'
// The keys in this collection match the `getView` property
// of the smart module in PHP.
export default {
blog_configurator: BlogConfigurator
}
```
After this the BlogConfigurator is registered. But we only need to create the BlogConfigurtor view.
```javascript
// File: src/Demo/ContentBundle/Resources/front/src/smartModules/BlogConfigurator.vue
```
The basic SmartModule is now **finished**!